
Home › How to Easily Save Movies and Series from Any Video Streaming Services › How to Record Paramount Plus (Easiest Ways)
There are many people wondering: “Can you record on Paramount Plus?” The clear answer is: Yes! There are many ways how to record Paramount Plus streaming content from PC screen and here we will show you the best Paramount Plus recorders.
Important: DMCA 1201
The US Copyright Act (DMCA) stipulates in Article 1201 that no “effective protection” of copyright-protected content may be circumvented.
The tool “Audials One” presented here fully meets these requirements. More information
Audials One is an easy-to-use streaming recorder for Windows PCs. It will help you to record Paramount Plus as video files fast from Chrome, Firefox or Edge.
Download and install the Paramount+ recorder Audials One on your Windows PC. Open the Video Streaming section. Select the needed video output format at the bottom of Audials One, for example MP4.
Click the Paramount+ icon in Audials One and select the recording settings like the speed, the web browser, ads removal, and subtitles. Audials One will ask you to restart the browser.
Find the video in Paramount+ that you want to record and play it back. Make sure the video is played in the original size to achieve the best possible quality. Your progress in the recording will be displayed in the control window.

Audials One automatically detects the video as soon as it is played back and stops recording when the video ends. When the recording of the video stream is completed the video will be transferred to the Audials playlist on the right side of your screen. You’re able to screen record Disney Plus in video file formats like MP4, WMV, AVI, 3GP, WebM or others. The Audials Windows software will tag the file afterward. You can now play the video with Audials or drag and drop it into another application or open it in the Windows explorer to export it.
iTop Screen Recorder is a Windows software to record content on your Windows PC at 1x speed.
Visit the official iTop Screen Recorder website.
Download the software by clicking on the ‘Free Download’ or ‘Buy Now’ button, depending on whether you want the free or paid version.
Install iTop Screen Recorder on your computer by running the downloaded file and following the installation prompts.
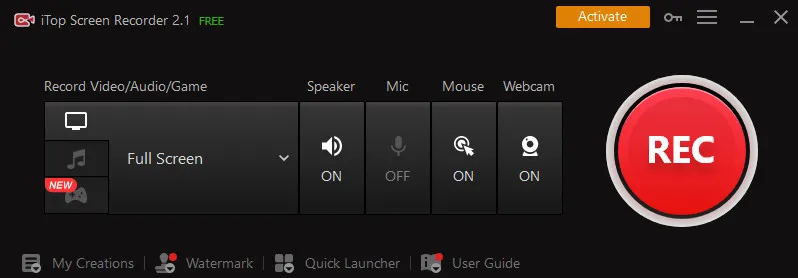
Open iTop Screen Recorder after installation.
Familiarize yourself with the settings. You can choose the recording area, whether to record audio (make sure to select system sound to record the audio from the video), and other preferences such as video quality and format.
Launch your web browser and go to the Paramount+ website.
Log in to your Paramount+ account.
Navigate to the content you want to record.
Go back to iTop Screen Recorder.
Set the recording frame to either full screen or a specific window depending on your preference.
Ensure that the ‘System Sound’ is enabled to record the audio from Paramount+.
Click on the ‘REC’ button in iTop Screen Recorder to start recording.
Quickly switch to the browser with Paramount+ and play the content you wish to record.
Once you have finished recording the desired content, return to iTop Screen Recorder and click on the ‘Stop’ button, which is usually represented by a square icon.
The video will then be saved automatically to your chosen folder.
iTop Screen Recorder may offer basic editing options to trim the recording or add annotations.
After any desired edits, make sure to save the final version of the video.
The EaseUS RecExperts screen recorder for Windows and Mac can be used to record Paramount+ and other content at 1x speed.
Visit the official EaseUS RecExperts website.
Download the software. They offer a free version with basic features and a full version that requires a purchase.
Install the program by following the installation prompts.
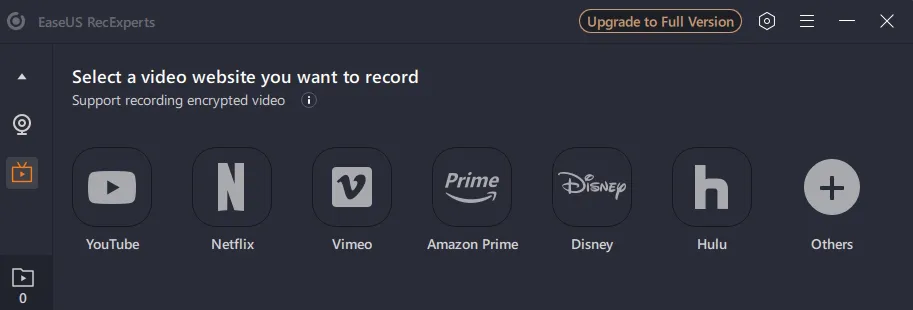
Open EaseUS RecExperts.
Familiarize yourself with the settings. You can select the recording area (full screen or a specific region), audio settings (ensure system sound is on to record the video’s audio), and other preferences such as output format.
Open your web browser and navigate to the Paramount+ website.
Log into your Paramount+ account.
Find the show or movie you wish to record and get it ready to play.
Switch back to EaseUS RecExperts.
Choose the ‘Full Screen’ or ‘Region’ option to select the recording area corresponding to where the Paramount+ content will be played.
Make sure ‘System Sound’ is selected so the audio from the show or movie is captured.
Click the ‘REC’ button on EaseUS RecExperts to start recording.
Quickly switch over to the browser window with Paramount+ and start playing the video you want to capture.
While recording, you can pause or resume as necessary using the controls on EaseUS RecExperts.
If you need to annotate or add something to the recording, use the tools provided within the software.
Once you’re done recording, click the ‘Stop’ button on EaseUS RecExperts.
The software will save the recording and allow you to preview it.
Use the built-in trimming feature to cut any unwanted parts from the start or end of the recording.
After reviewing, save the recording to your preferred location on your computer.
If you need to perform more advanced editing, use the tools available in the software or another video editing application.
The Xbox Game Bar on Windows 10 and Windows 11 is a built-in feature primarily designed for recording gameplay, but it can also be used to record other activities on your screen, such as streaming services like Paramount+. Please note that this way to record Paramount Plus does not work for all content. Here’s how to record Paramount+ with Xbox Game Bar:
First, make sure the Xbox Game Bar is enabled on your PC. You can check this by going to Settings > Gaming > Xbox Game Bar and ensure the switch is turned on.
Open the Paramount+ app on your PC or navigate to the Paramount+ website using a web browser.
Log in to your account and cue up the show or movie you want to record, but don’t start playing it yet.
Press the Windows key + G on your keyboard to open the Xbox Game Bar. If it’s the first time you’re using it, you might have to go through a quick setup process.
Once the Xbox Game Bar is open, you’ll see several widgets. The one you need is the “Capture” widget, which is used to record the screen.
If you don’t see the Capture widget, click the ‘Widget Menu’ button (it looks like a menu with several horizontal lines) and select ‘Capture’.
To begin recording, click on the ‘Start Recording’ button in the Capture widget (it has a circle with a dot inside). A small timer and recording symbol will appear to indicate that recording has started.
Quickly switch back to the Paramount+ content and start playing the video. The Xbox Game Bar will continue to record in the background.
When you’ve finished recording the desired content, you can stop the recording by pressing the Windows key + G to bring up the Xbox Game Bar again and then clicking the ‘Stop Recording’ button in the Capture widget. Alternatively, you can click the recording timer that appears on the screen while recording.
Once you stop the recording, a notification will appear telling you that the game clip was recorded. You can click on this notification to view the recording.
If you miss the notification, you can always find your recorded videos by default in the ‘Videos’ folder, inside a subfolder named ‘Captures’.
Downloading videos from the Paramount+ Android or iOS app for offline viewing is a feature available to Paramount+ Showtime subscribers. If it is not important for you to keep the videos permanently on your PC, this will be a good option. A download is deleted automatically after 30 days. If you start playing back the downloaded video, it will expire after 2 days. Here is a step-by-step guide on how to download content within the app:
Ensure that you have the latest version of the Paramount+ app installed on your device. Update the app if necessary through the App Store on iOS devices or Google Play Store on Android devices.
Launch the Paramount+ app on your device.
Browse through the available content on the Paramount+ app to find a movie or TV show that you want to download.
Not all content is available for download due to licensing agreements, so look for titles that have the download icon, which is usually an arrow pointing downward.
Once you have chosen the content, tap on the title to view its details.
Tap on the download icon next to the episode or film you want to download. For TV shows, the download option is typically next to each episode on the show’s page.
The app will start downloading the selected video to your device. You can track the progress within the app.
The download time will vary based on the size of the file and the speed of your internet connection.
Once the download is complete, navigate to the ‘Downloads’ section of the app to find your downloaded content.
On most devices, you can access this section from the main menu or profile section.
Tap on the downloaded video in the ‘Downloads’ section to start watching it offline.
Please note that there might be a limit to how long the content will remain available to watch offline, and some titles may have restrictions on the number of times they can be downloaded.
Product
Audials One
iTop
RecExperts
Xbox Game Bar
Download from Paramount+ directly
Recording speed
2x
1x
1x
1x
Fast download
Add and remove subtitles anytime
✔
rendered in video
rendered in video
rendered in video
x
Remove ads automatically
✔
x
x
x
x
Smartphone and cloud media manager
✔
x
x
x
✔
Price
$49.90
$32.99
$69.95
free
free for subscribers
There are multiple ways how to record Paramount Plus. If you need the videos temporarily for offline watching, it will be sufficient for you to download videos directly from the Paramount+ mobile app. However, you need to be a Paramount+ Showtime subscriber to benefit from the downloading feature.
If you want to keep your video files permanently even if the content is not available anymore, it is better to use a Paramount+ recorder software like Audials One. the latter has the advantage that you do not need to start and stop recording manually. You will get a perfect and clean video file that does not need to be edited with a video cutter. Audials One gives you the option to record at high speed, to remove ads and to add subtitles.
Yes, you can record Paramount Plus with a recording software like Audials One. Please note that it is not possible to record Paramount+ with a DVR because the content is streamed via the internet, not like a TV channel.
To record Paramount Plus with Audials One, start the software, open the Video Streaming section and click Paramount+. Choose the required settings. Open a Paramount+ video in the browser. Audials detects it as soon as it starts and records it as a video file.
Videos from Paramount+™ are copyrighted. Any redistribution of them without the consent of the copyright owners may be a violation of the law in most countries, including the USA. Audials AG is not affiliated with Paramount+™, nor the company that owns the trademark rights to Paramount+™. This page is provided for compatibility purposes only, and in no case should be considered an endorsement of Audials Software products by any associated 3rd party.

Easy Paramount Plus Recorder
Record Paramount Plus content at 2x speed, remove ads automatically and add subtitles in any language. Manage your videos on multiple devices. More info about Audials One. Try the demo now for free!
Cookie Settings on audials.com: We use cookies to provide you with the best possible user experience, ensure security, enhance performance, and present personalized advertisements. Customize your preferences by clicking on "Configure". For more information, see our Privacy Policy and the Google Privacy & Terms
